

How To Fill Paint On Google Drawings
| | Drive Chapter 7: Drawings |

Table of Contents
Drawings in the classroom
Creating a new drawing
Revision history
Editing Drawings
Menu Overview
Toolbar Buttons
Adding images to your cartoon
Snap to guides
Polylines
Lines, arrows, and scribbles
Keyboard modifiers
Line connectors
Formatting Drawings
Moving, resizing and rotating objects
Formatting your drawings
Using text in drawings
Paint format tool
Comments and Discussions in Drawings
Inserting Comments in a Drawing
Working with Comments
Discussions
Notification settings
Using the Research Tool in Drawings
Web results
Images
Quotations
Commodity citations
Places
Dictionary
Choosing your citation format
Reporting content in Research
Using Drawings with Docs, Sheets, and Slides
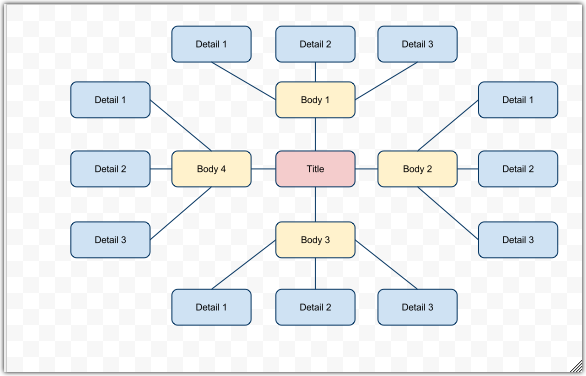
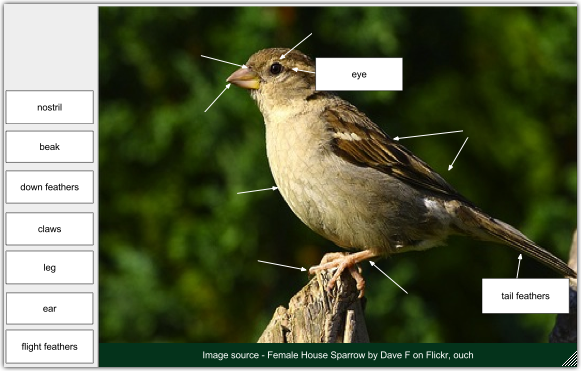
Drawings in the classroom
With Google D rawings, you lot can create and collaborate on menstruum charts, pattern diagrams, and other types of drawings. You tin can also conversation with other editors from within Google drawings, publish drawings equally images, annotate on images, or download drawings to your calculator.
Listen maps
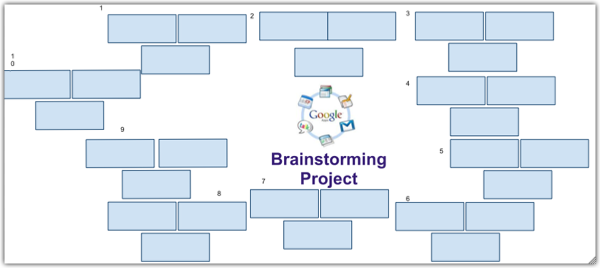
Graphical organizers
Labelling Activities
Timelines

Creating a new drawing
In that location are a number of ways to become started on a new Drawing in Google Docs.
Start in the Doc uments List
To become started on a new drawing go to your Docs list, click Create new and select Drawings 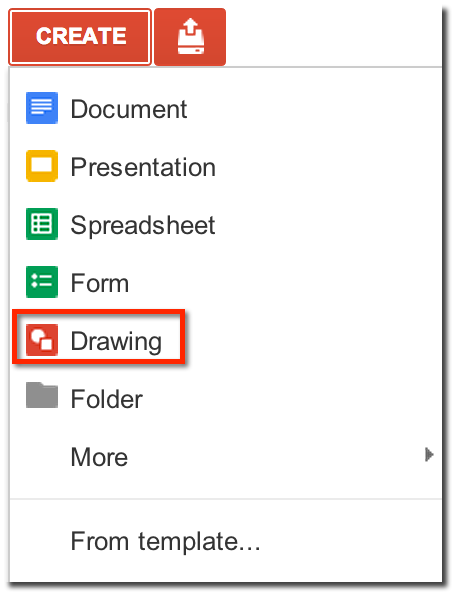
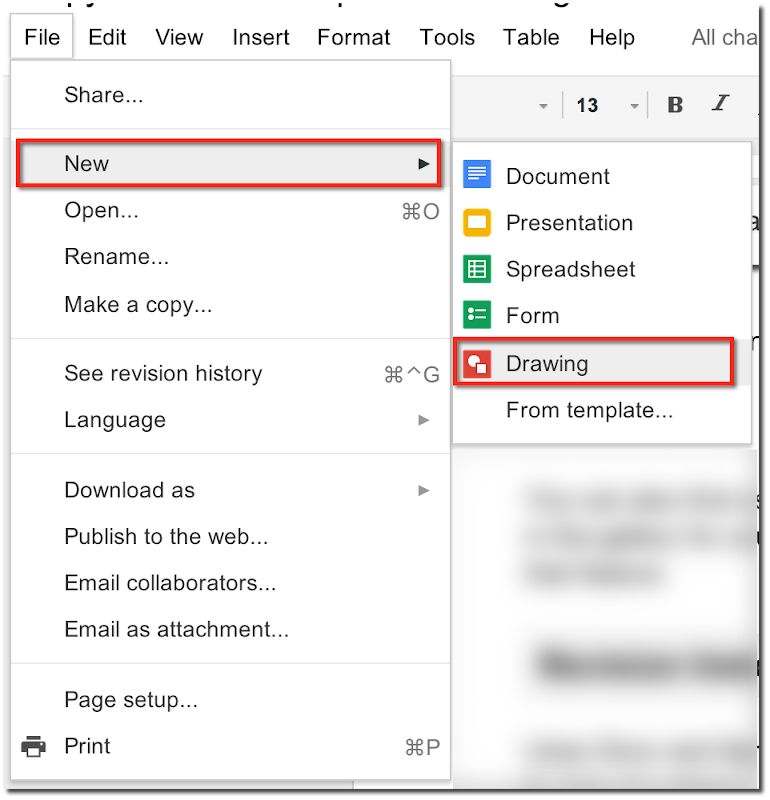
Alternately, you can begin a new cartoon from inside an existing document by going to File > New > Drawing
You can also notice user submitted templates for drawings in the public Template Gallery and in the gallery for your Apps for Education domain, if your domain administrator has enabled that feature .
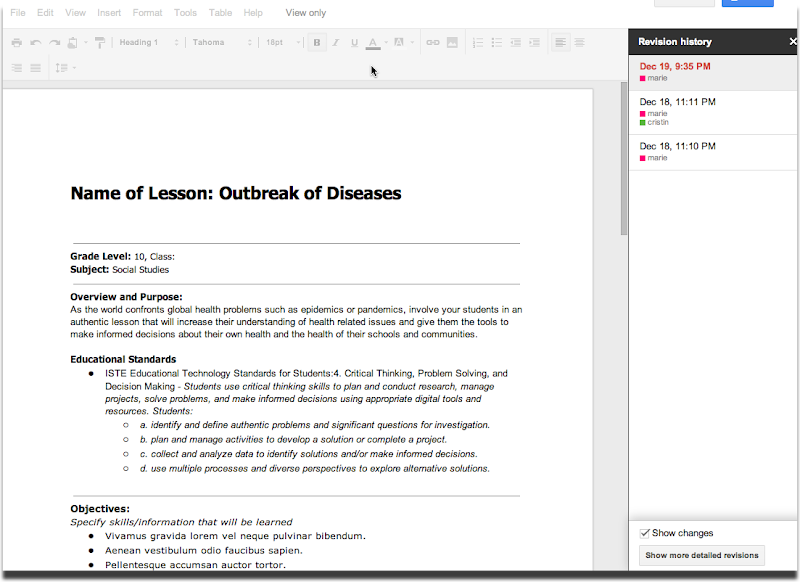
Revision history
Likes Docs and Spreadsheets, Google Drawings has a revision history pane that allows you lot to view at a glance all changes fabricated to a doc past each collaborator. To access revision history in Google documents, drawings, and spreadsheets, follow these steps:
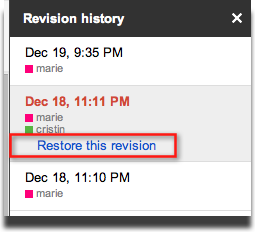
- Select File > See revision history .
- Click a fourth dimension stamp in the right column to run into what changes were fabricated at a given fourth dimension or use the arrow keys to scan through many revisions speedily.
- If you'd like to revert to the version you're currently viewing, click Restore this revision . Annotation : Restoring your document to a previous version does not eliminate any versions of your document. Rather this version moves to the summit of your revision history, maintaining all previous versions of your document, including the current version.
- If you'd similar to render to the the current version of your document to continue editing, click the X in the upper right of the 'Document History' pane.

For all Google D rive document types, revisions are grouped into curt time periods to make it easier to see the full history of changes. If you desire to meet more fine-grained revisions, click the Show more detailed revisions button in the lower correct of your document.
Editing Drawings
The menu options and the buttons in the Cartoon toolbar provide users with the ability to create flow charts, design diagrams, and other types of drawings.
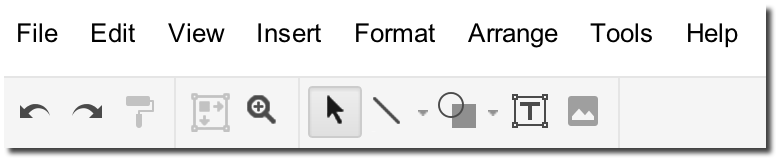
Menu Overview
Edit
Click this drop-downwards menu to cut, re-create, paste, delete, duplicate, and select all shapes/images on a cartoon .

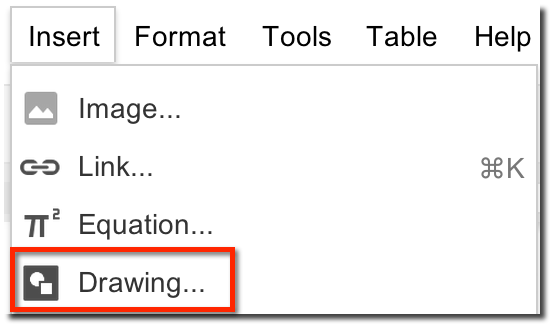
Insert
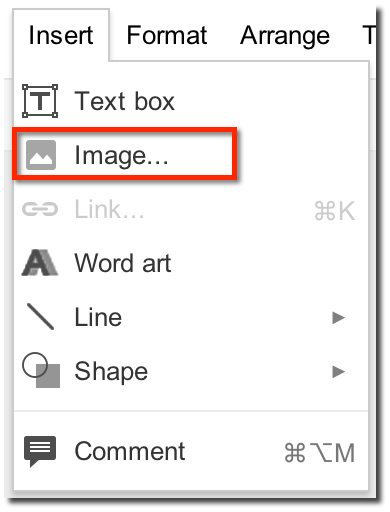
Use this bill of fare to insert text bo xes, images, links, Word Art, lines, and shapes . Yous can also click the individual buttons in the toolbar to do this.

Once you select an option, follow these instructions:
- Text box: Click where you'd similar to add the text box, enter your text, and press Enter. Your text will exist added to your cartoon. Use text boxes instead of word fine art if you'd similar to use word wrap or specify a different text size. Larn more most using text in Google drawings .
- Image: Enter a URL of an epitome or practise an image search to find what you're looking for, and click Select. Learn more virtually adding images to your drawing .
- Link: Insert a link to a web or email address.
- Discussion fine art: After selecting this option, type your text and press Enter. All of the shape editing options are available with word art, so you can rotate, choose make full and line color, and change line width.
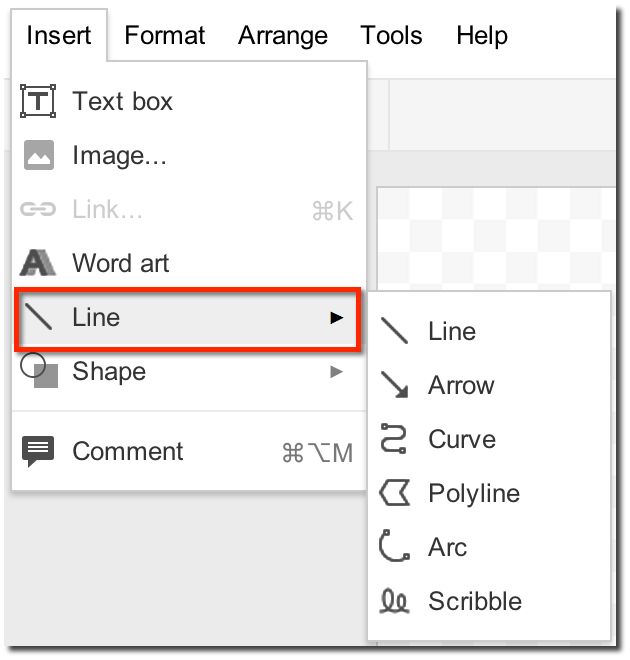
- Line: There are a number of line options including straight lines, arrows, curved lines, polylines, arcs, and scribbles.
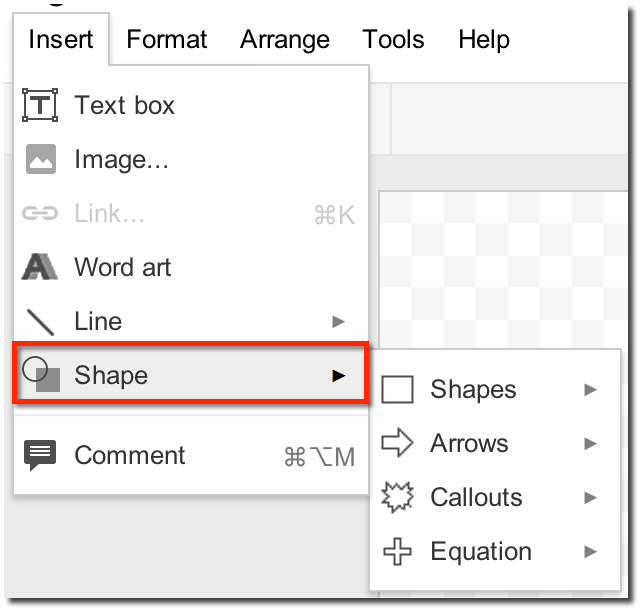
- Shape: Select this menu particular, and then choose from shapes, arrows, callouts or equations.

Format
Click this menu to alter the groundwork of your cartoon, align and rotate items, select snap to grid or snap to guide, change the guild of the items (for example, bring a shape forrard), and group items. Acquire more well-nigh formatting your drawings .
Toolbar Buttons

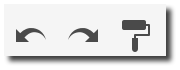
Undo or redo changes
Y'all tin undo and redo changes by clicking the two arrows to the left side end of the toolbar.

Zoom in and out
To zoom in and out on your drawings, click the Zoom push button (the magnifying glass) in the toolbar.

Shapes
Select a shape from the Shape card in the toolbar.

Then, click anywhere in Google drawings to insert the shape in the default size, or elevate your mouse to change the size of the shape.
Fill color, line colour, line width, edit text, bold, and more
These and other editing options are available but when you've selected a specific item. For example, when y'all insert a text box or word fine art, you'll see the Edit text button at the right end of the toolbar. Click it to change the selected text.

Note: To duplicate a shape, just concord the Ctrl fundamental (Command fundamental for Macs) while dragging the shape.
Adding images to your drawing
To insert an image into your drawing, follow these steps:
- Click Insert > Image... , or click the Image button in the toolbar.
- In the window that appears, y'all can cull one of these options:
- Click Upload and navigate to the image from your hard bulldoze that y'all'd like to insert. Choose this option for images you take stored on your estimator.
- Click Take a Snapshot to use your webcam to have a picture and insert it into the drawing.
- Click URL and paste the web accost of the image you'd like to insert. Choose this option if yous already have an epitome y'all'd like to add.
- Click Albums to admission image files y'all have uploaded to Picasa on the web.
- Click Google Drive and the subfolders to insert an image from your Google Drive documents.
- Click Search

Search Google images. T ype a word and click Search images . Once yous find a issue y'all like, click the paradigm. Keep in mind that there are specific usage rights that use . Select but images that you've confirmed yous tin can utilise legally in your intended context, and make sure y'all include appropriate attribution if necessary. Cli
Click Stock Images to search for images in a free, stock photo archive. 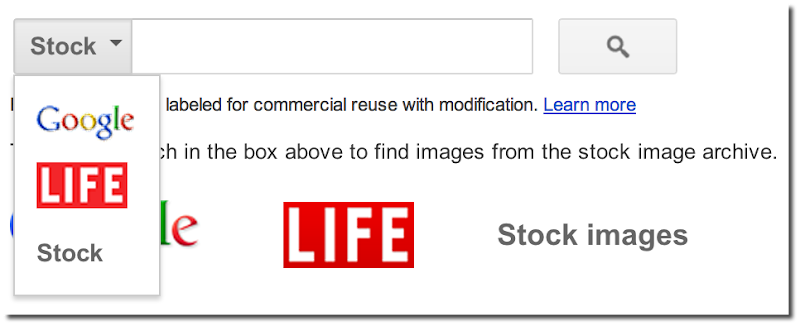
- Click Select .
Pro tip: If y'all're using the latest version of Chrome, Safari, or Firefox, yous besides have the option of dragging an image from your desktop and drib it directly in the drawing canvass.
Afterward inserting the prototype into your drawing, you tin add together scribbles, shapes, lines, arrows, and text boxes on pinnacle of the image.
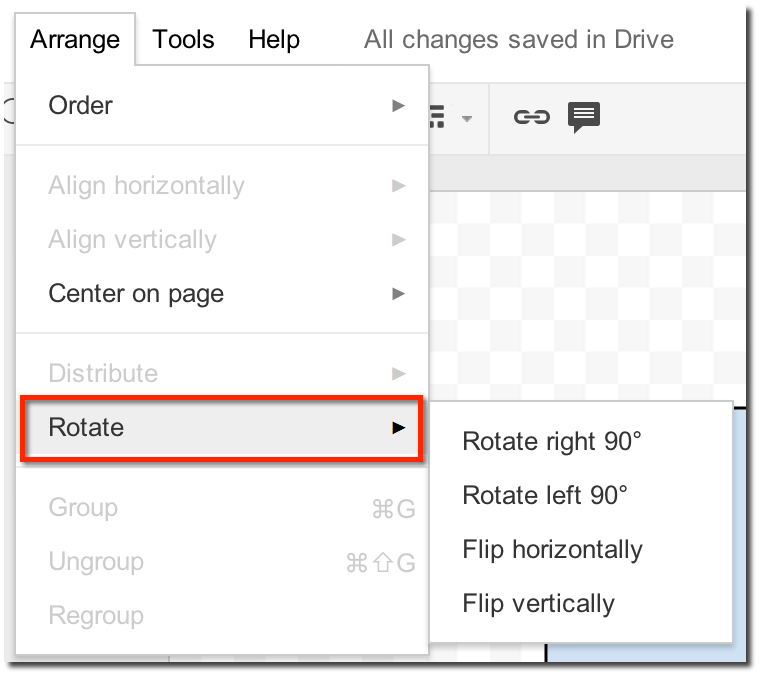
Yous can resize the image past dragging one of the resize (white) handles, and the epitome volition expand and contract with your cursor's motion. Images can be resized to scale by holding the Shift key while dragging a corner resize handle. To flip an image, click Arrange -> Rotate , and select one of the options available. Alternately, yous can correct click on an paradigm and then select Rotate from the menu that appears.
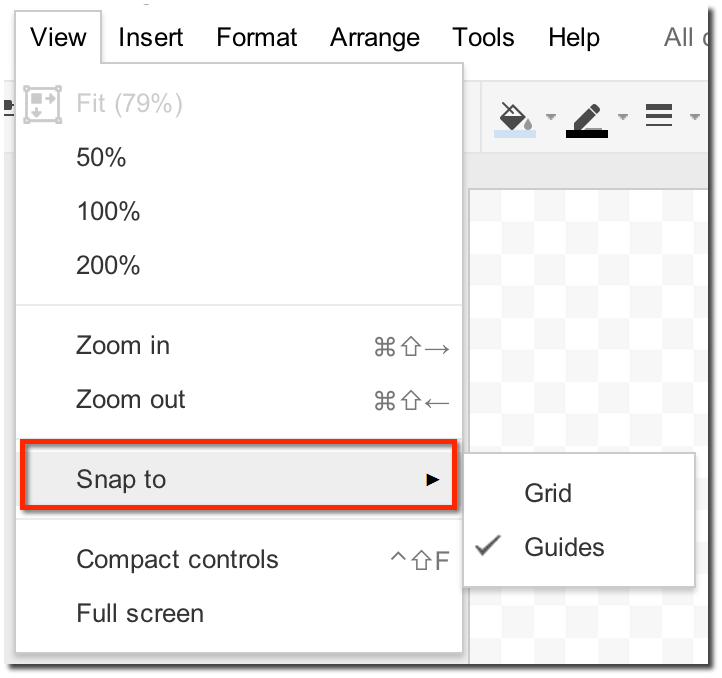
Snap to guides
Snap to guides allows you lot to marshal objects with the drawings canvas and other objects. With this choice enabled, guides appear whenever you movement an object into alignment with the border of another object. These guides besides appear when you move an object to the horizontal or vertical middle of the drawings canvas.

To enable snap to guides, correct-click in the drawings canvas and select Snap to guides, or click Format > Snap to guides .
You tin chop-chop move, drag, resize and rotate objects using keyboard modifiers when performing other actions.
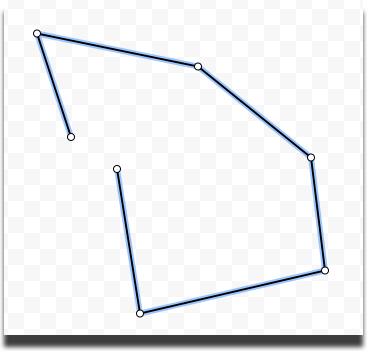
Polylines
Polylines are continuous lines composed of multiple segments. To create them, click the Polyline button from your drawings toolbar, to the left of the Shapes push button.

Later on drawing a segment of your polyline, click to end the segment and brainstorm your adjacent segment. If y'all want to cancel the last segment and go back to selection fashion, press Escape on your keyboard. When you've finished, connect the endpoint of your last line segment with the origin point of your polyline to create an enclosed shape. Alternatively, click near the endpoint of your concluding line segment to complete the shape.
When you're done drawing the polyline, you remain in polyline way and then you can immediately draw another one. Press Escape to return to option way.
If you'd similar to rearrange the vertices, double-click the polyline.
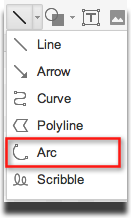
Lines, arrows, and scribbles
Lines, arrows, and scribbles are continuous lines composed of one segment. To create them, click Lines push button to the left of the Shapes button.
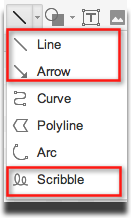
After choosing which object you'd like to depict, position your mouse and click in the drawing canvas where yous'd like the object to begin, motion your mouse to draw, and then click to terminate the segment.
After you lot have finished drawing, y'all can click in the canvas once again to start drawing some other line of that type. If you're washed, you tin can printing the Esc key or select another tool to deselect your object.
When you accept a line, pointer, or scribble selected, three buttons appear toward the cease of the toolbar that allow you to modify the fashion of the line or the endpoints. Click the buttons and select an choice from the drop-down menus to use that style to your object.
Scribble
Click to cull your kickoff bespeak, and drag to create the scribble. It will be automatically smoothed out one time yous've finished.

Arcs
You tin too create arc lines in your drawing by selecting arc and then drawing your points. Similar the other types of lines, the weight and color tin exist increased or changed.

Keyboard modifiers
If you love shortcuts, then yous'll love the keyboard modifiers in Drawings. There are many useful features available if yous utilise keyboard modifiers when performing other deportment. Hither are some examples:
Moving or dragging
- Turn off guides or snap to filigree and smoothly drag your object: hold the Alt key ( Option key if using Mac) while dragging an object.
- Restrict to vertical or horizontal dragging: concur the Shift cardinal while dragging.
- Nudge an object in 1 pixel increments: concur the Shift key while moving an object with the arrow keys.
- Create a indistinguishable of an object while leaving the original in place: hold the Ctrl cardinal while moving an object.
Resizing
- Preserve an object's aspect ratio while resizing: agree the Shift key while resizing an object.
Rotating
- Rotate in xv degree increments: concord the Shift key while rotating an object.
Line connectors
Connectors are special lines that stay "glued" to shapes. When y'all move or rotate shapes that have connectors betwixt them, the lines attached will move and stretch with them then the shapes stay continued.
- Click on the shape tool or go to Insert > Shape to select an object to insert into your cartoon.
- If yous want to utilise two of the aforementioned shape, select the shape, right click + Re-create, right click + Paste it into your drawing.
- Click on the line or pointer tool.
- Hover your cursor over a shape, and cherry-red connectedness points will appear.
- Click on the cherry connectedness point that you want your line to connect, and elevate your cursor to another connection point on a 2d shape before releasing.

Formatting Drawings
Moving, resizing and rotating objects
To move, resize and rotate an object, simply click the object you'd similar to change. You'll see a green rotate handle, white resize handles, and yellow aligning handles (where applicable).
Moving objects
Click whatsoever object to select it, then drag it with your mouse or arrow keys. Yous can hold the Shift key while dragging to constrain the movement to the nearest horizontal or vertical axis. You lot can concord the Shift key while moving with the keyboard to move the object by one pixel.
Snap to Guides is enabled by default in the full editor. Snap to grid is enabled by default in the embedded editor.
The selection Snap to grid allows objects to automatically marshal to an invisible grid or to other objects when moved, resized, or inserted. Click View > Snap to grid to disable this option, or hold downwardly the Alt primal to temporarily disable it.
Resizing objects
Drag one of the resize (white) handles, and the object volition expand and contract with your cursor's movement.
Objects can be resized to scale by property the Shift cardinal while dragging a corner resize handle. To flip an object, drag a resize handle to the contrary side.
Reshaping objects
Objects that tin can be reshaped will include yellow handles. Drag the adjustment handle(s) to change the appearance of your object.
Rotating objects
Drag the rotate (green) handle to rotate the object. Hold the Shift key while rotating to constrain the rotation to fifteen degree increments.
Right-click an object and select Rotate to rotate objects at 90 degree increments and flip them horizontally or vertically.
To move, resize or rotate multiple objects at the same fourth dimension, concur down the Shift key while you click each object. You can likewise elevate your mouse in the cartoon background to select multiple shapes.
If y'all're in the procedure of manipulating an object and modify your heed, you can abolish any action past pressing the Esc central prior to releasing the mouse button.
See more than details well-nigh keyboard modifiers .
Formatting your drawings
After inserting shapes, you tin format them using the buttons in the toolbar. When you select a shape, the Fill color , Line color , Line width , and Dashes buttons appear. 
Here are some ways to format your drawings:
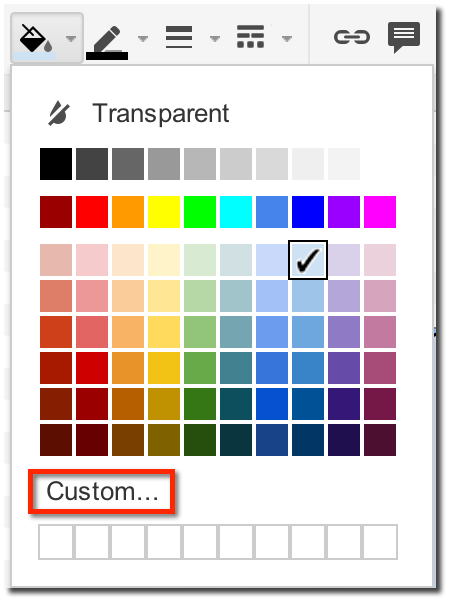
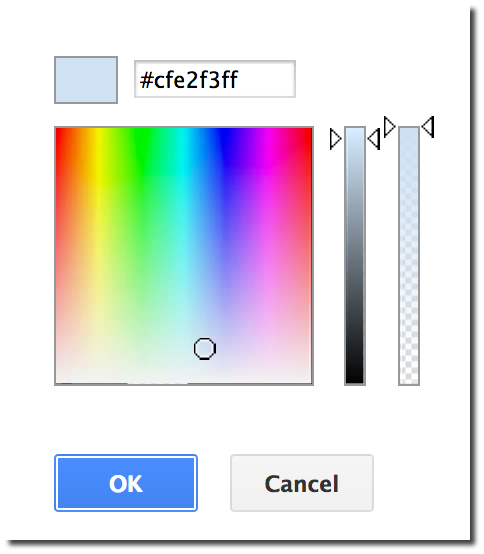
- Accommodate the colour of a shape: Click the Make full color push and choose the colour you'd like to employ.
- Increase or decrease transparency: Click the Make full colour > Custom color and drag the opacity selector at the far right of the bill of fare. Dragging down increases an object's transparency, while dragging up decreases transparency.

| | |
Using text in drawings
At that place are three means to use text in your drawings:
Insert text boxes
- Click the Text box push in the toolbar or select Insert > Text box .
- Click in the canvas to create a default size text box, or drag the text box to resize it.
- Type your text, press Enter, and the text appears in the text box. You can modify the text by double-clicking the shape or by right-clicking and selecting Edit text... .

You lot tin format text boxes like you would any other shape .
Add together text within shapes
- Double-click the shape, (yous can likewise correct-click information technology and select Edit text...)
- Type your text, printing Enter, and the text appears in the shape. You can modify the text by double-clicking the shape or past right-clicking and selecting Edit text... .
Add word art
- Click the Insert bill of fare and and then select Word Art .
- Type your text and press Enter. Your discussion art volition be added to the drawing canvas and you can format it similar yous would whatsoever other shape.

Formatting text in text boxes and shapes
When you lot select a text box or shape with text in it, the Bold , Italic , Text colour , Align , and Font size toolbar items appear. You can apply these styles to the entire text within the shape.
Formatting discussion art
When you select a word fine art shape, the Bold , Italic , and Font toolbar items appear. You tin can apply these styles to the entire shape, as well every bit use the standard shape formatting options to set fill and border styles.

Change the size of your shape by resizing information technology direct, and go on in heed that pressing Shift while resizing will preserve the text'due south aspect ratio.
Note : word art scales text as yous resize, while text inside shapes wraps without resizing as y'all modify the size of the shape.
Paint format tool
Google Drawings lets you copy the formatting you've applied to specific object to some other object using the Paint Format tool. If yous're familiar with the Paint Format tool in Google Sheets , this works in a similar mode.
With the Pigment Format tool, you can copy a shape or object's background and line style. With a text box, you tin can utilize the Paint Format tool to replicate the text formatting.
To paint a format to a specific shape, line, or text box, follow these steps:
- Select the source object from which y'all'd like to copy the formatting.
- Next, select the Paint Format icon from the Drawings toolbar. Later on you've pressed the icon push button, your cartoon volition remain in Paint Format style until you click the icon push again or stop copying over an object'south formatting.
- Concluding, select the target object, and observe the formatting adjust to match the source object.


Comments and Discussions in Drawings
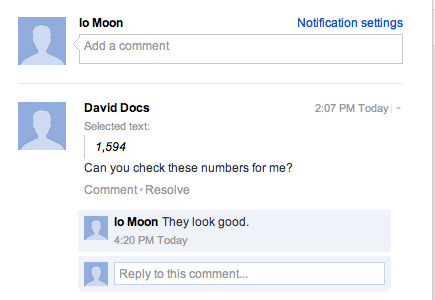
Comments allow y'all have a conversation nearly something you're working on. Annotate threads, called discussions, help you go along runway of comments, accost your comments to specific people, and respond to and follow comments from your email inbox.
Inserting Comments in a Drawing
Comments are a handy mode of calculation notes to your Drawings that are visible to viewers and collaborators. These can exist invaluable for communicating with collaborators about specific parts of the drawing, as well as making notes nigh changes you've made or would like to brand.
To add a comment, follow these instructions:
- Highlight or select the text, object, or shape yous'd like to annotate on.
- From the Insert carte, select Comment . You can likewise apply the keyboard shortcut Ctrl + Alt + Yard ( Cmd + Pick + M on a Mac) to insert a annotate. Yous can also right click on a shape or text box and so select Comment .
- Type your comment in the box that appears to the right of the certificate.

If you lot'd like to address your annotate to a specific person, type a plus sign followed past their e-mail accost, similar this: +johndoe@google.com. That person will receive an email with your comment.
Working with Comments
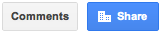
After inserting a comment, there are two main places you tin work with it — within the yellowish comment box, or from within the discussions thread, which you tin can access by clicking the Comments button in the meridian right-paw corner of your browser window.
Y'all tin can respond to a comment with a new post, edit or delete a previous comment you lot've inserted, and resolve the word when you're ready to remove it. Resolving a discussion removes the word from your drawing, only resolved threads will ever be available nether Comments in the right-hand corner of your certificate.
Your profile photo (the picture you use in Gmail or on your Google+ profile ) volition be displayed with your comments.
Discussions
From the discussion thread, you tin review all discussions, including those discussions that have been resolved. From this menu, you tin can also modify the notification settings for discussions.
Sometimes it can be tedious to have to scan through all the comments you and your collaborators have fabricated on an particular. If you open up the discussion thread with the Comments button, you can keep track of all of an item's discussions, including those that have already been resolved. In this view, y'all can also make comments about the entire drawing.
Notification settings
You tin can command your give-and-take notifications. Under Comments in the upper right-mitt corner of your certificate, select Notifications settings . A dialog will open, and yous tin can select if you'd like to receive email notifications. If you opt to receive email notifications, you can also select what blazon of notifications you'd like to receive.
Using the Research Tool in Drawings
The Research tool makes information technology easy to add data from the spider web to your documents and presentations. To access the tool:
- Select the Research option from the Tools menu.
- Use the keyboard shortcut ( Ctrl + Cmd + I on Mac, Ctrl + Alt + I on PC).
- Right-click on a specific word and select Research.
The Enquiry tool volition announced forth the right-hand side of your drawing. You can start a search by typing into the search bar. You can narrow your search to specific types of results (e.g. images, quotations) by using the drop-downwardly menu in the search bar.
Researching different types of information relevant to your document or presentation
When conducting a search, the Research tool will show you dissimilar types of results — web results, images, quotations, maps, reviews, personal results, and more.
Apply the back arrow to the left of the search bar to return to the previous page of your search results and the forwards arrow to move forrad in your search results.
Follow the instructions below to explore search results relevant to your document or presentation.
Web results
Under the spider web results category, you'll find a number of websites related to your search. If yous select one of these results, you'll see several options:
- Select Preview to run across a preview of the website. Click on the site link at the top of the preview pane to open this folio in a separate window, or click the arrow on the left edge to shut the preview.
- Select Insert link to add a link to the website into the torso of your document.
- Select Cite to create a footnote citation of this web result within the body of your document.
Images
Images volition appear in the general search, as well as an paradigm search. Narrow your search results to merely images past selecting "Images" from the drop-down menu in the search bar.
Quotations
Narrow your search results to only quotations by selecting "Quotes" from the drop-downward menu in the search bar. Once you accept selected the quotation you'd like to utilise in your document, click Insert to add it to your drawing.
Commodity citations
Narrow your search results to only articles by selecting "Scholar" from the driblet-downward carte du jour in the search bar. Once y'all have selected an article you'd like to read or reference, click on that entry in the search results. You lot will come across a Web or PDF hyperlink in the upper left-hand corner of the entry that will take y'all to a web or PDF version of the commodity itself. You volition see a Cited by hyperlink in the upper correct-paw corner of the entry, showing how many times the article has been cited, that will straight you to the Google Scholar list of sources that have cited this article. Clicking on either of these links will open the result in another window.
To insert an article citation into your certificate, select the article and click Cite . In presentations, you may insert a link to the article by pressing Insert .
Places
When conducting a search in the Inquiry tool for a geographic location, your search results may include a map. Yous tin edit this map by selecting Edit and then zooming in/out or dragging the map. Once you lot have the exact map image yous'd like to include in your certificate, click Insert . Y'all tin can also elevate and drop the map prototype into your document.
Lexicon
Utilise the inquiry tool's dictionary to search for a word'southward definition.
Choosing your citation format
To select a default format for citations added to your document or presentation, click the drop-downwardly pointer below the search bar. Utilise the drop-down menus to choose from MLA, APA, or Chicago citation formatting, and customize others settings (like image filtering preferences for images or language settings for the dictionary). Your selected citation format is applicative to citations for spider web results, images, quotations and commodity citations.
Reporting content in Research
You can report a problem, or report content that is of concern to you, for our review.
To report violation of your copyright, use Aid > Study abuse > Copyright infringement and follow the steps on that page. When filling out the web form to report copyright infringement, please be sure to enter the URL of the specific detail in the Research tool results that is of business to you.
Using Drawings with Docs, Sheets, and Slides
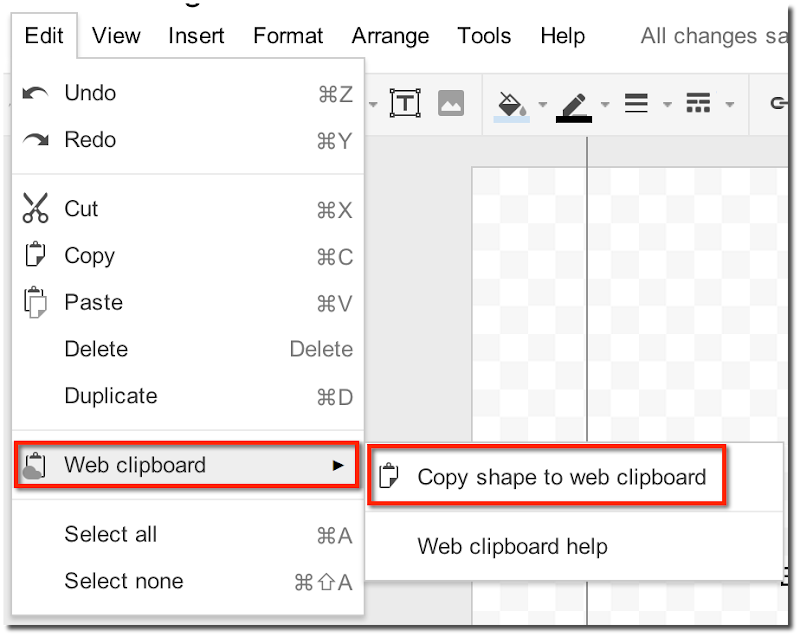
Once you've created your drawing, and accept edited and shared information technology with others, yous might desire to insert information technology (embed it) in a Google certificate. Utilise the spider web clipboard to re-create the whole drawing, or whatever selection within the cartoon, and paste it into your doc using the spider web clipboard.
The embedded cartoon is a copy of the original, and both can exist edited independently later copying. So, if you lot need to brand whatever minor changes to the drawing, you tin edit it from inside the document, using the embedded version of Google drawings. Simply click outset the drawing then the Edit link that appears. This version of Google drawings includes a more limited gear up of features.
You can employ Google drawings to enhance your presentations. Y'all may desire to design consummate slides within drawings and then utilize the web clipboard to paste them into your presentation when they're complete.
Once the cartoon has been embedded, yous tin can't share that version every bit a separate doc. However, you can employ the spider web clipboard again to re-create and paste the embedded version into a new drawing that you can share.

Yous can also create a new drawing from within an existing document, spreadsheet or presentation by going to Insert > Cartoon .
Source: https://docs.google.com/document/d/1M84JGMrO4C5gnvv1Rl2lC2C79VIROD_TRjvC2GxZBOE/mobilebasic
Posted by: bakerherief95.blogspot.com
0 Response to "How To Fill Paint On Google Drawings"
Post a Comment